

 on March 6, 2014.")
Adding a YNU Mail account to iOS (iPhone and iPad)
Emails sent to YNU Mail Addresses can be checked using iOS devices as follows. Note: The example here uses iOS 8.
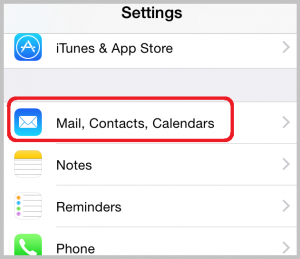
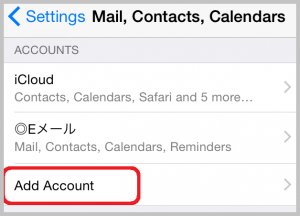
- Tap [Settings], [Mail, Contacts, Calendars], then [Add Account].
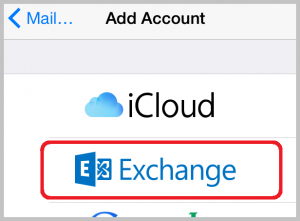
- Tap [Exchange].
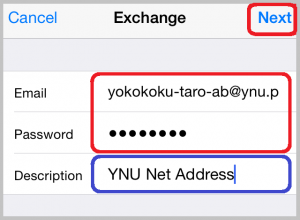
- In [Email], enter your YNU Mail address (for example, yokohama-taro-ab@ynu.jp). In [Password], enter the modified password instead of the initial password. (Before setting up email on iOS, sign in with the YNU Mail via a web browser and change your password from the initial password.) Optionally, enter ‘YNU Mail’ in [Description]. Tap [Next]. The email application will detect the necessary settings to configure your account.
- Note: If your device cannot detect the correct configuration, the following screen will appear. If this happens, you may have made a mistake in entering [Email] or [Password]. Select [Cancel] and perform setup again starting with Step 2.
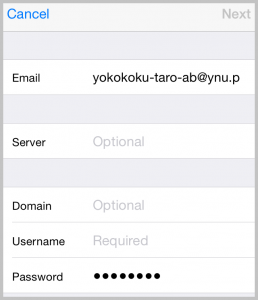
- Note: If your device cannot detect the correct configuration, the following screen will appear. If this happens, you may have made a mistake in entering [Email] or [Password]. Select [Cancel] and perform setup again starting with Step 2.
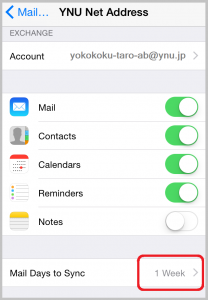
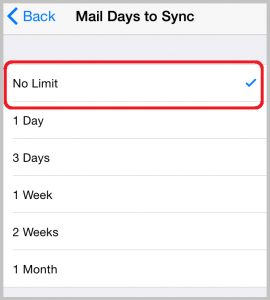
- If you want to synchronize all emails, select the account you just added and choose [No Limit] for [Mail Days to Sync]. Note: By default, emails for the previous week are displayed.
Note: By default, emails for the previous week are displayed.
- Open the Mail application to check whether the account has been added successfully.
- For more detailed setup instructions and the latest setup information, check the Office 365 website.
- Sign in to Office 365 and click [Settings](gear icon) ⇒ [Office 365 settings]. Then, click [Software]⇒ [Phone & tablet] on the left. Select a phone or tablet. Click [Access email].